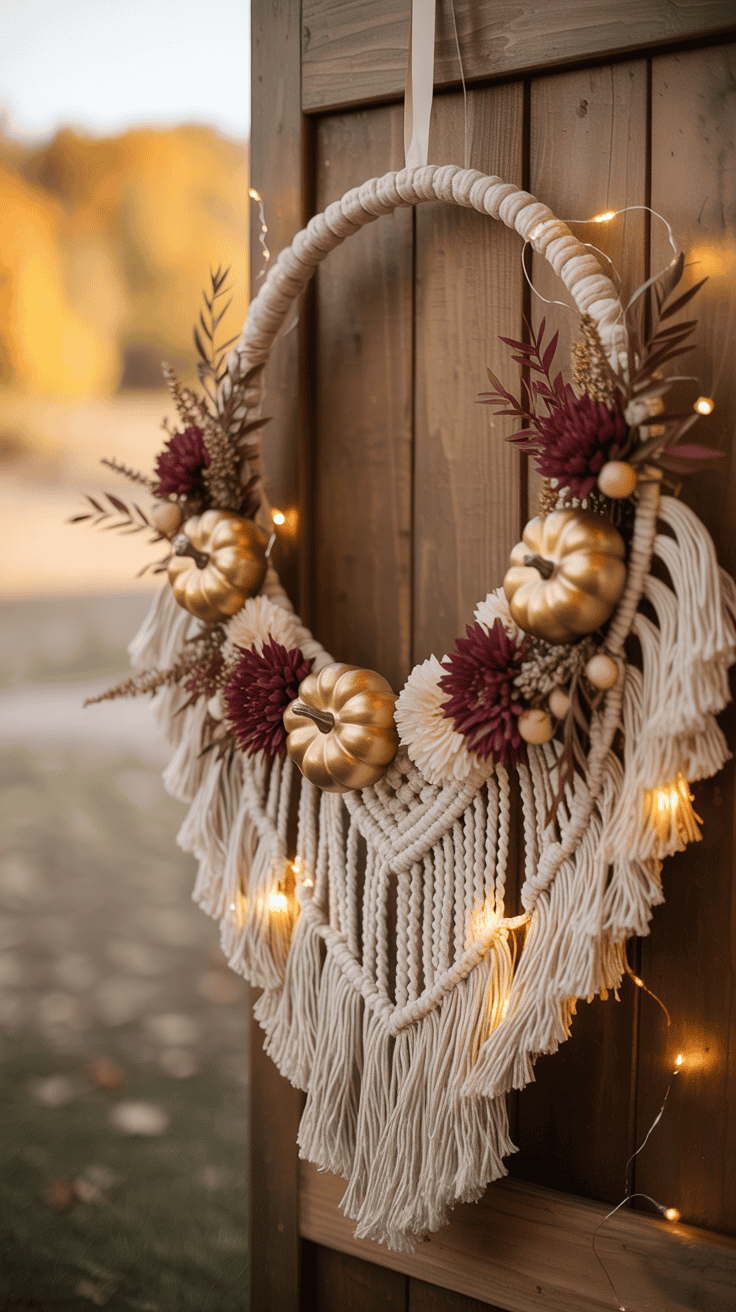
How To Craft a Macrame Fall Wreath for Your Front Door
With three wild boys running around, I need every bit of cozy fall charm I can get! Nothing feels more welcoming than a Macrame Fall Wreath on the front door when the air turns chilly and the leaves start to change. Handmade wreaths always catch my eye, and I love how they make our entry feel warm and personal, even with chaos inside.
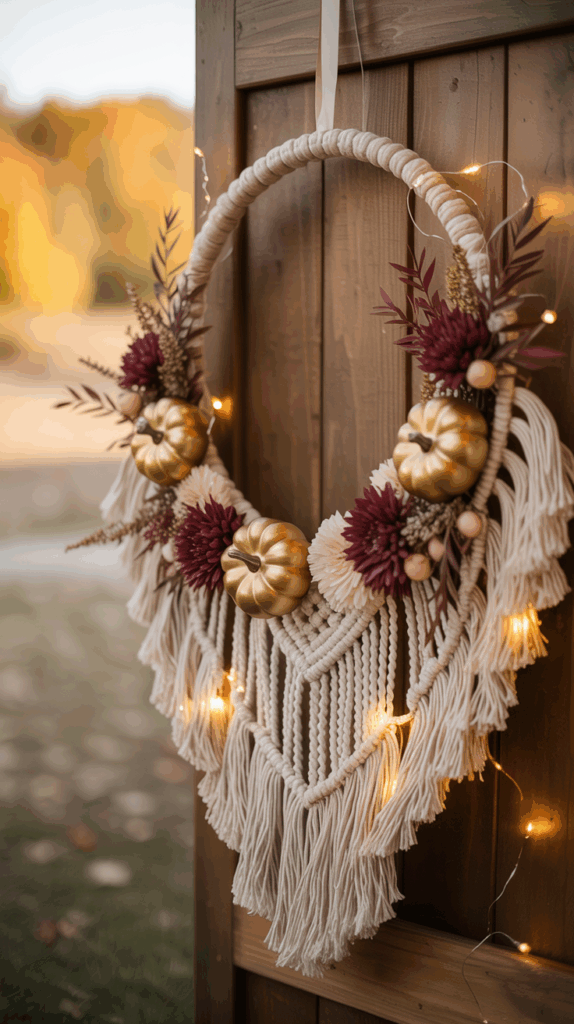
I used this macrame wreath kit and it turned out so cute — neutral, boho, and totally seasonal.
You don’t have to spend hours for a gorgeous result (trust me, time is not my friend most days). I’ll show you, step by step, exactly how to make a beautiful macrame wreath that fits a busy mom schedule. If you’re hoping for something pretty, easy, and full of autumn magic, you’re in the right spot!

Gather Materials and Tools


Before I start tying any knots or picking out cute details, I like to get all my supplies ready. Having everything in one spot saves my sanity (especially when little hands love to borrow things mid-project). If you’re making a Macrame Fall Wreath for the first time, don’t overthink it! With a bit of planning, you’ll have the right rope, a bundle of charming accents, and a few tools ready for a smooth, fun project.
Choosing the Right Rope

The rope you pick is the heart of your wreath project. I look for a cotton rope that’s between 3 millimeters and 5 millimeters thick. This size is perfect—it’s thick enough to hold its shape and soft enough not to scratch little hands or the door. Plus, cotton is easy to work with, so tying knots and undoing mistakes is a breeze (or at least breezier when there’s a toddler bumping the table).
Why choose cotton rope?
- It’s soft to the touch.
- It holds knots well and won’t fray as quickly.
- You don’t have to worry about stiff, scratchy textures.
When it comes to colors, fall is my favorite excuse to get creative! I like to pick:
- Deep oranges
- Burgundy reds
- Olive greens
- Warm yellows or rich browns
If you can’t find these colors, natural white or cream rope also looks pretty and lets the fall accents shine. For one 12-inch wreath ring, I usually cut about 10 to 14 pieces of rope, each around 3 to 4 feet long. The actual amount depends on the knot styles and fullness you want. If you go bigger or smaller with your wreath, just add or subtract rope until it feels right. It doesn’t need to be perfect—eyeballing it has always worked for me!
Selecting Seasonal Accents

This is where the magic happens and the kids get extra excited! I love adding little seasonal touches that shout “fall,” even if my house is still full of summer shorts and toys. You don’t need to buy a ton of stuff, either. I usually use what I have on hand, which helps keep costs low and adds a personal touch.
Some of my favorite seasonal accents:
- Dried leaves (gathered from the yard or picked up at the grocery store)
- Mini pumpkins or gourds (real or faux; both work)
- Pinecones
- Rust-colored wooden beads
- Faux berries
- Cinnamon sticks
If you’re on a tight budget or just want to get creative, check the junk drawer! Old fabric scraps in plaid or velvet, little felt shapes in leaf or pumpkin forms, or even leftover ribbon can add charm. I’ve even used bits of an old flannel shirt that had seen better days. The trick is to mix textures and fall colors so your Macrame Fall Wreath looks rich and inviting.
Easy repurposing ideas:
- Cut out leaves or pumpkins from old felt sheets for a handmade touch.
- Twist scraps of orange or plaid fabric around the wreath frame for softness.
- Paint acorns or wooden beads in gold or bronze for extra shine.
With the right rope and some fun accents, your supply pile will start to look like fall magic waiting to happen. It really is as simple as collecting, sorting, and letting your own style shine!
Basic Macrame Knots for Beginners
If you’re ready to jump into your Macrame Fall Wreath, learning a few easy knots is all it takes to turn plain rope into something special. When I first started, I worried it might be too tricky or slow, but these basic knots are the foundation for almost every macrame project. Once you see how simple and forgiving they are, you’ll wonder why you waited so long! With a little bit of practice (and maybe a mug of cider nearby), you’ll have beautiful knots that hold everything together and even add a playful twist here and there.
Square Knot Step‑by‑Step

The square knot is the workhorse of any Macrame Fall Wreath. It’s tidy, sturdy, and gives you those classic rows and bands you see in macrame crafts. I like using the square knot as the “backbone” of my wreath design—it holds everything in place and gives that lovely woven look.
Let’s break it down:
- Left over right: Take the left rope, cross it over the two center ropes, and tuck it under the right rope. Pull tight.
- Right over left: Now, take the right rope, cross it over the two center ropes, and tuck it under the left rope. Pull again.
- Tighten up: Gently tug both outer ropes to tighten the knot and keep it neat.
That’s it! You repeat these moves, one after the other, until you have a line of strong, even knots. The trick is not to rush. Even tension gives the prettiest result, so I like to clip the top of my cords to a clipboard or even tie them around a small dowel. This keeps both my hands free so there’s less sagging or uneven bumps, especially when a curious little one tugs on my arm.
Quick square knot tip:
- Use a chip clip or clothespin to anchor your rope to a table edge if you don’t have a dowel. It makes a world of difference!
Half Hitch and Spiral Knot
The half hitch is another household favorite! It’s like the little helper of knots, perfect for edging, making loops, or adding a bit of swirly detail along the side of your Macrame Fall Wreath. When you repeat the half hitch on one side, something magical happens—it starts to twist all on its own, turning into a spiral knot that looks just like curly vines or tendrils.
How to make a basic half hitch:
- Take your working cord, wrap it over and under your base cord, making a little loop.
- Pull the end of the working cord through the loop.
- Gently pull tight. You’ll see the knot start hugging the base cord.
To create a spiral knot:
- Keep making half hitches on the same side instead of alternating. After a few knots, your rope will twist and turn, making a playful spiral shape. I love this bit! It looks just like a fall vine and gives everything a fun, whimsical detail.
If you haven’t tried these knots before, don’t worry. I always use a spare piece of rope to practice before tying knots on my real wreath. This way, I don’t get frustrated if I need to start over, especially if my “helpers” decide to run off with the rope halfway through!
Practice pointers:
- Try a few knots on a scrap piece until your hands get used to the motion.
- Don’t stress about perfection—handmade is supposed to feel unique and special.
Once these basic knots feel comfortable, tying them in creative ways for your Macrame Fall Wreath becomes relaxing and even a bit addictive! Every knot brings character and holds a little story (or a tiny fingerprint smudge) from our busy, happy home.
Designing the Fall Wreath Shape

Nothing pulls together the inviting vibe of a Macrame Fall Wreath quite like a well-planned shape! My boys love to jump into the action, so I find that measuring and planning the diameter turns into a giggle-filled math mini-lesson right at the kitchen table. When I lay out the steps and let them help, they stay interested and I stay sane. Getting this part right makes the rest of the wreath project flow. Here’s how I make sure the base of my wreath is sturdy and just the right size to make our front door pop with autumn color.
Measuring and Planning the Diameter
Before I cut any rope, I pick a wreath ring to match my vision—usually a 12-inch ring for our door, but sometimes bigger if I’m feeling bold! I want my knots to look full and not skimpy, so I plan out the rope lengths before anything else. This is where my little helpers always jump in. They grab measuring tapes, stretch ropes across the floor, and insist on double-checking every number (which takes longer but, honestly, that’s half the fun).
To keep things simple and avoid running short, I use a quick formula:
- Rope length needed = finished diameter × 3.14 × 1.2
That 1.2 multiplier is my secret weapon. It accounts for all the tightening that comes with knotting. Knots eat up rope faster than you think, especially if you want a chunky, cozy look. When in doubt, I add a few extra inches so we’re not scrambling for a piece at the end.
Here’s an easy way to involve your kids and make it a family moment:
- Let them read the measuring tape or circle the diameter on paper.
- Hand over a calculator for multiplying!
- Have them help mark the rope with colorful chalk.
A chart comes in handy for quick planning:
| Wreath Diameter (inches) | Rope Length Needed (feet) |
|---|---|
| 10 | 3.2 – 3.8 |
| 12 | 3.8 – 4.5 |
| 14 | 4.5 – 5.3 |
I always remind myself: a little extra rope is better than running out when I’m halfway through and the kitchen timer is dinging!
Creating a Sturdy Base Ring
The ring is the backbone of the wreath. Without a good base, knots sag and the whole thing just looks a bit sad. I like to start with a simple metal or wooden ring, but even a sturdy embroidery hoop will do in a pinch. To make the base look chunky and rich (and to hide any shiny metal), I wrap a thin cotton rope all the way around, pulling it snug as I go.
Here’s my favorite approach:
- Start with one end: Tie the tip of your rope to the ring with a strong square knot. This keeps everything locked in place, even when my littlest guy tries to “help” by tugging from the other side.
- Wrap it tight: Wind the rope around the entire ring, keeping it side by side so none of the ring shows. Pull every wrap firm and straight. It should feel solid—if anything feels wobbly, pull a little tighter.
- Finish securely: Once you’ve gone all the way around, tie off the end with another square knot. I usually tuck the knot under the wrapped layers to hide it (because kids love to point out funny-looking knots).
If I know we’ll have heaps of wind (our neighborhood gets gusty in the fall), I add a second layer of rope in a different color. Not only does this make the base extra strong, but it gives the wreath a warm, chunky look that’s perfect for autumn.
Pro tip:
If your kiddos want to help but aren’t quite ready for knot tying, let them hold the extra rope or press down the layers as you go. Sometimes we even make it a race—who can spot the most “wiggly” wraps or count the turns fastest?
Designing the base might not seem like the most glamorous part of making a Macrame Fall Wreath, but getting it right is the secret to that wow-worthy front door look!
Assembling the Wreath
Now comes my favorite part—turning all those tidy knots and piles of accents into a Macrame Fall Wreath that makes the whole porch smile. Assembling everything feels a bit like building a puzzle, but with soft ropes, colorful leaves, and chunky beads. My boys line up their “fall treasures” and help me figure out where everything should go. This part always brings out their creativity and it fills our afternoon with laughter. If you want a wreath that looks fresh and full, these next steps keep the look balanced and cheerful.
Attaching Leaves and Vines
I always start by attaching my leaves. If you’ve never tied a half hitch before, this is the perfect spot to try it. The half hitch makes a tight knot that hugs the base rope and keeps each leaf from shifting, even when the door opens fifty times a day!
Here’s how I do it, with a little help from my crew:
- First, line up your leaves and decide where you want each one. I like to space leaves every 2 or 3 inches. This helps the wreath stay full and stops it from looking too crowded, but you’ll still have room for berries, beads, or anything else you want to add.
- Grab your rope and leaf stem, then use a half hitch to tie the stem to the base. Pull the knot snug so nothing slips. I keep things loose enough that I can adjust a bit as I go.
- Repeat the half hitch with each new leaf, moving around the ring. I keep the direction the same to give a smooth look.
- Next, I braid soft yarn vines between leaf clusters. This part is a huge hit with the boys! We choose yarn in fall colors, and I show them how to do a simple three-strand braid.
- We slip the braided vines in and out between leaves, securing the ends behind clusters with another half hitch or a dab of hot glue if we need things extra strong.
The kids love choosing which leaf goes where, and it becomes a real team effort. If you ever feel like your wreath looks bare, just tuck in a few more leaves or add a second vine. The more layers, the cozier it feels!
Adding Autumn Colors and Textures

Color is everything in a Macrame Fall Wreath. I want all those rich fall colors to pop and mix, like leaves on the sidewalk after a big gust. I use yarn in oranges, mustards, and deep reds to bring out that classic autumn feel. Sometimes I even add a little olive green if I’m feeling fancy.
Here’s what works great for layering up color and texture:
- Layer yarn strips in different shades. I braid or twist them together, then tuck them throughout the wreath (especially near big clusters of leaves or along the outer edge). Mixing chunky and skinny yarn works wonders for creating depth.
- Tiny pops of sparkle make kids’ eyes light up! I add a few shiny wood beads or glass ones. Just slide them onto the rope before knotting them in.
- Pinecones are a must in our house. I like to tuck tiny ones into the weave or glue them at the base of bigger leaf groups. They bring in real texture and look so sweet beside the warm yarn.
- Don’t be afraid to twist a tiny branch or cinnamon stick right into your cluster. This adds that “nature walk” feeling, like you scooped up all the best parts of fall and brought them home.
- If you’re short on time and patience (who isn’t?), felt shapes are quick to add. The boys cut out little pumpkins and acorns, and we stitch or glue them between the knots.
One thing I learned after boy number three is to always tuck a few extra beads, leaves, and yarn bits into my “repair kit” bag. Kids love to touch and play with the wreath, and little pieces sometimes get loosened or go missing. Having backup supplies means I can fix things in five minutes—even while making dinner.
All these layers come together to make a wreath that feels both homemade and pulled-together. Every little knot and color choice makes it feel even more like ours. I can’t help smiling when I see it on our door!
Finishing Touches and Hanging
Once all the knots are tied and your leaves are shining, there’s nothing more thrilling than those final steps before you hang your Macrame Fall Wreath. This is the moment where it goes from just a fun mom project to an eye-catching hello for every neighbor and delivery driver! Even with a house full of wild boys (and the endless parade of muddy shoes), making sure your wreath hangs strong and stays pretty through the whole season keeps that happy fall feeling lasting. Here’s how I make sure my wreath looks perfect and survives all the action of our busy front porch.
Securing the Loop for the Door
If you want your Macrame Fall Wreath to hang straight and safe, the top loop is key. I always use a thick, sturdy rope so it won’t fray from lots of use or from little hands tugging out of pure curiosity. Here’s my quick and easy method:
- Pick a rope that matches the style of your wreath (I usually use the same rope as the base or something in a cozy fall color).
- Cut a piece about 12-18 inches long—this gives enough room for tying and adjusting.
- Fold the rope in half and place the midpoint at the very top of your wreath base ring.
- Loop both ends over the ring and pull them through the folded part, making a secure lark’s head knot. This helps spread out the weight.
- Tie a tight square knot with the loose ends at your desired hanging length.
- Tug the loop firmly to check that it will not slip. Give it a little bounce test by holding the wreath up and making sure nothing moves or sags.
I always make sure the knot is extra snug, especially since my youngest loves testing everything with a good yank. For extra peace of mind, I double up on knots or thread the ends through the base once more before trimming. Having a secure loop makes the wreath look finished and professional. If you’re worried about the weight, test the hanging strength before placing it on your front door.
Why test the weight?
- Front doors get slammed, leaned on, and bumped by little bodies and big pets.
- Secure loops mean no sudden surprises or repairs mid-season.
- A safe loop helps the wreath stay centered and straight, avoiding that sad droop after a few days.
These steps might feel small, but they make all the difference when fall wind or a “helpful” kid puts your wreath to the real test!
Weatherproofing Tips
Making a Macrame Fall Wreath for the front door means you’re also signing up for a little battle with the weather. I want mine to last past Halloween and into Thanksgiving, so a few simple tricks help it survive rain showers, sudden chills, and the daily in-and-out of our bustling family.
Here’s what I’ve learned the hard way (and through a few soggy mishaps):
- Spray a light coat of clear outdoor sealant over the finished wreath. I use one made for fabric so it won’t make the rope stiff. Do this outside or in a well-ventilated area, and let it dry for at least 24 hours. This simple step helps protect against water marks and keeps the colors bright.
- Avoid direct rain if possible. If your porch is covered, you’re in luck! No wreath truly loves to be soaked, especially with real leaves or cotton rope. Hang yours where it catches less wind and water. If we’re expecting big storms, I move mine to the inside of our glass door or onto a hook just inside our entry.
- Store in a dry, airtight box when not in use. After the season, I carefully pack my wreath in a plastic bin or large bag. This prevents moisture, dust, and bugs from sneaking in over the winter. Label your box and keep it in a spot that won’t get damp. That way, your wreath comes out next year looking just as good!
Here’s a quick comparison to help remember how each storage option works for your wreath:
| Storage Method | Protection Level | Best For |
|---|---|---|
| Open shelf/hook | Low | Short-term, dry days |
| Cardboard box | Medium | A few weeks, mild weather |
| Airtight plastic bin | High | Long-term/off-season storage |
Following these tips keeps your Macrame Fall Wreath looking homemade and happy, not tattered or mildewed! Like any mom project, the last step matters just as much as the first. With a little attention and care, your fall creation will greet your family (and all the neighborhood trick-or-treaters) with bright, cozy style every single day.

Conclusion
Making my own Macrame Fall Wreath with the boys has been such a bright spot in our busy fall. Every leaf and knot brings little hands and big hearts together at our kitchen table, which honestly feels like magic during those wild afternoons. The wreath turns our front door into a cheerful welcome, showing off autumn’s best colors and adding a special touch that helps everyone feel at home.
Nothing beats the glow of sharing our favorite creations. If you give this project a whirl, I’d love to see your Macrame Fall Wreath! Snap a photo, show off those helping hands, and tag this blog on social media so we can swap even more cozy ideas.
Let’s make this fall extra special, one wreath (and kid-sized giggle) at a time. Thank you so much for spending your time here!
This post may contain affiliate links. Read the full disclosure here.