How to Make Scarecrow No Carve Pumpkin Ideas for Your Porch
Welcome to fall at our house—a season full of cozy moments, crunchy leaves, and all the pumpkin fun! If you’re searching for new no carve pumpkin ideas, you’re in great company. I’m a busy mom of three wild and lovable boys, so I know how hard it can be to find easy, mess-free projects!
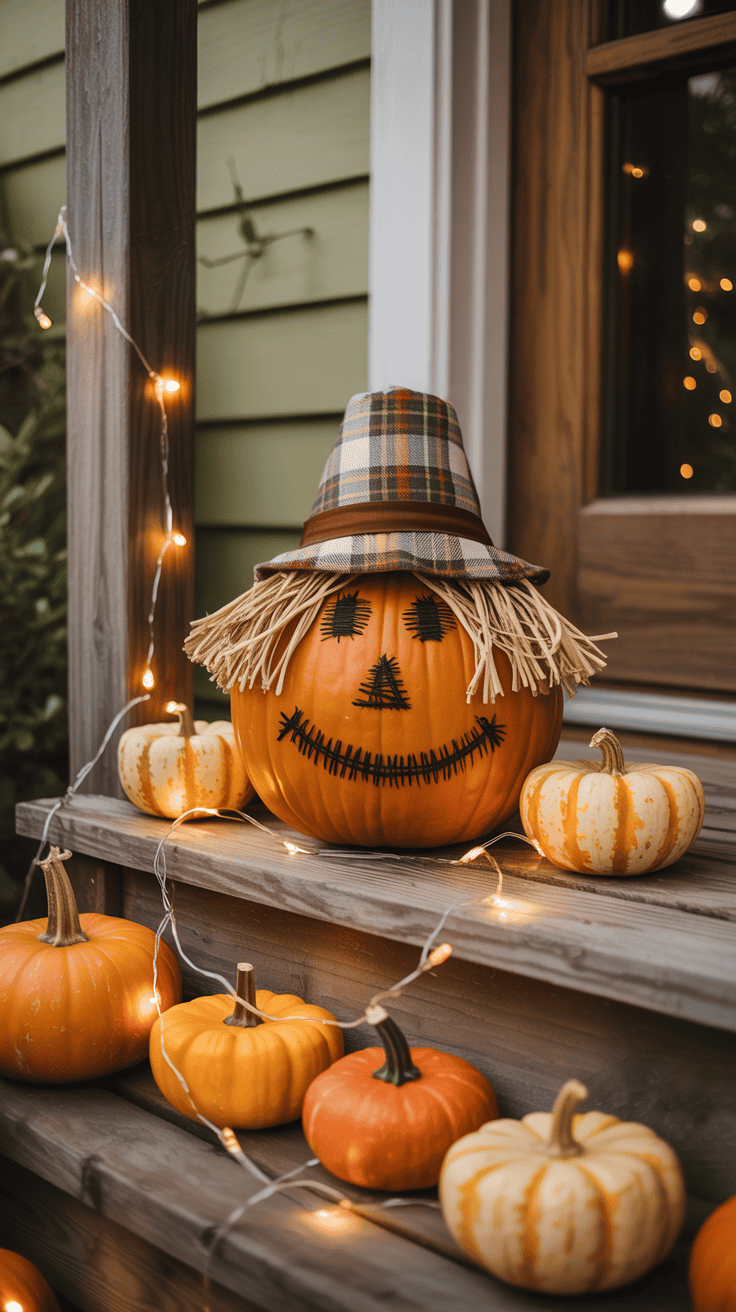
This scarecrow pumpkin craft kit makes porch decorating quick and mess-free.
That’s why I love no-carve crafts, especially ones like our porch scarecrow, because they help us enjoy the season together without carving tools or a giant mess in the kitchen. Perfect for busy moms like us who want simple memories and lots of smiles!
Why Choose No Carve Pumpkin Ideas for Your Porch Decor?


Decorating the porch for fall is always a highlight in our house! The kids buzz with excitement, the air feels crisp, and my head spins with ideas for making our front step look welcoming. When life gets busy (which is pretty much always with three boys underfoot), clean-up and safety matter even more. That’s why I look for simple, fun, and mess-free ways to decorate. Choosing no carve pumpkin ideas for our porch has saved my sanity more than once, and honestly, it made our fall memories even sweeter.
Simple and Mess-Free
Let’s be honest, traditional pumpkin carving sounds amazing, but the reality can be a nightmare. Seeds everywhere, messy hands, and the constant worry about sharp carving tools. With no carve pumpkin ideas, I skip the knives and the goo, so my boys stay safe and I don’t need to clean pumpkin guts out of the porch cracks.
Here’s why going mess-free makes sense:
- No pulp or seeds to scoop or scrub away.
- Everyone, even toddlers, can join in.
- I spend less time on prep and more time having fun.
- Clean-up is fast. Just toss or save the decorations for next year!
Safe for Little Helpers

I love when my boys join every step, but sharp knives and carving tools are too risky for little hands. With no carve pumpkin ideas, no one has to miss the fun. Paints, markers, stickers, yarn, and fabrics turn ordinary pumpkins into porch showstoppers.
When the boys ask, “Mom, can I do it myself?” I can say yes with confidence!
Some of our favorite safe options:
- Stickers and washi tape: Great for any age and peel right off for quick adjustments.
- Paint and glue: Awesome for getting creative without a hazard in sight.
- Yarn or fabric: Wrap or tie on easy accents—nothing sharp required.
More Room for Imagination
Carving has its limits but decorating pumpkins without carving opens up endless ways to play. The best part? Every pumpkin on our porch can look completely unique, just like each of my boys’ personalities!
No carve styles bring out all kinds of creativity:
- Dress pumpkins with old hats, scarves, or even tiny shirts.
- Draw faces, write silly sayings, or stamp on patterns.
- Let kids invent their own pumpkin “characters” without any extra tools.
Lasts Longer Through the Season

Carved pumpkins look cute for a few days, then they start drooping and collapsing (and sometimes smell a little funky). No carve pumpkin ideas mean those pumpkins can stick around for weeks, looking bright and cheerful the whole time.
Here’s what I notice:
- No carved holes keeps the pumpkin sturdy, so it won’t cave in too soon.
- Great for early decorators—no waiting until Halloween week.
- Reusable decorations mean next year’s porch can be just as fun.
Budget-Friendly and Flexible
I’m always on the lookout for ways to stretch our decorating budget. With no carve pumpkin ideas, I can use stuff we already have at home—old craft supplies, yard finds, and even my kids’ outgrown scarf collection.
Simple ways to save:
- Use leftover ribbons, buttons, or costume bits.
- Try washable paints so pumpkins aren’t wasted.
- Change up the look all season long, since no carving is permanent.
No carve pumpkin ideas make porch decorating easy, safe, and full of laughter. As a mom, I want to make memories and keep stress low, and this approach checks every box.
Supplies You’ll Need: Getting Ready for No-Carve Pumpkin Scarecrow Fun

I like to start any no carve pumpkin ideas with a plan and a big table full of stuff that’s ready to grab. There’s nothing worse than sitting everyone down, rolling up sleeves, and then realizing you forgot something basic. Trust me, with three boys bouncing around, I want everything at my fingertips so the fun doesn’t stop! The best part about this scarecrow project is most supplies are things you already have or can easily find on your next errand run. Not only does this save money, but it also helps keep your porch decorations unique and a little quirky (which is exactly what I love).
Let’s walk through what you’ll need so you can lay it all out, get those little hands excited, and keep the mess to a minimum.
Pumpkins: The Perfect Starting Point
You don’t need the fanciest pumpkins. In fact, picking different shapes and sizes turns the scarecrow into something really special. I let my boys choose their favorites at the patch or grocery store.
Here’s what I grab:
- One medium or large pumpkin for the scarecrow “head”
- Optional: a couple of smaller pumpkins for hands or extra decorations
- Look for pumpkins with smooth sides and sturdy stems for easy decorating
A smooth pumpkin makes drawing and gluing much easier. Bumps and odd shapes give personality.
Basic Decorating Supplies

Once you have the pumpkins, you’ll want to set up a stash of kid-friendly decorating goodies. Most of these are probably already tucked away with your family art supplies.
Gather up:
- Washable acrylic paints or paint markers
- Black permanent marker (for facial details)
- School glue or a glue gun (adults only for hot glue)
- Craft brushes and sponge applicators
- Scissors and kid-safe craft knives (just for adults, only if cutting fabric or foam)
I lay out a drop cloth or old newspaper. It saves my table from colorful fingerprints and keeps clean-up easy.
Scarecrow Face and Clothing Bits
This is one of my favorite parts because it’s a chance to get creative and let the kids “dress up” the scarecrow. You don’t need to buy new clothes or pricey craft kits. Old shirts, outgrown hats, and bits of fabric can all find new life.
Here’s a simple list:
- An old plaid shirt or flannel (the classic scarecrow look)
- Small kids’ jeans or overalls (even adult jeans with legs cut and knotted at the ends)
- Hat: floppy sun hat, straw hat, or baseball cap
- Scrap fabric: bandanas, ribbon, or felt for patches and scarves
- Buttons, yarn, or googly eyes for playful faces
- Raffia, straw, or even shredded paper for “hair” and stuffing
Let the kids “shop” your donate pile. It adds so much personality to each scarecrow.
Porch-Ready Accessories
You want your scarecrow to be sturdy. Sometimes fall winds try to knock things over, so I always use a few items to help keep everything right where it belongs.
Don’t forget:
- Tape (clear packing tape for quick fixes)
- Wooden stakes, dowels, or a tomato cage for inside the scarecrow body or shirt, to keep it upright
- Twist ties or rubber bands for shaping arms and legs
- Safety pins or binder clips to secure clothes if you don’t want to commit to glue
If your porch is wide open, anchoring a scarecrow makes a big difference. I throw a couple of heavy rocks inside the pants legs if it gets breezy!
Optional Extras for Added Flair

Now comes the fun part: all the little extras that give your no carve pumpkin scarecrow its own style. My kids’ favorites always change, but I keep a small box of random things just for their wild suggestions.
Think about:
- Stick-on gems, felt shapes, or stickers for the face
- Feathers, leaves, or sticks for extra details
- Old mittens for hands (adorable and cozy)
- Mini Halloween props: tiny brooms, toy birds, or a stuffed crow
- String lights to wrap around the scarecrow for magical evenings
Adding these little details makes each scarecrow a family original! No two ever look the same on our porch.
Quick Prep Tips for Busy Moms
Before you call the kids over, I like to have everything in bowls or baskets by type. Paints together, fabric scraps in a basket, and all the “special” pieces in one easy-to-reach spot. A roll of paper towels and a trash bag nearby keeps sticky hands under control.
A little prep ahead helps the project feel smooth and organized. My boys get straight to the fun without waiting, and I keep my sanity as the project gets messy in the middle!
Having everything ready to go makes your no carve pumpkin ideas come together with less stress and more giggles. And trust me, when your porch is glowing with your own scarecrow creation, you’ll be glad you skipped the knives and mess and just enjoyed the magic of fall.
Step-by-Step Guide: Creating a No-Carve Pumpkin Scarecrow with Your Kids

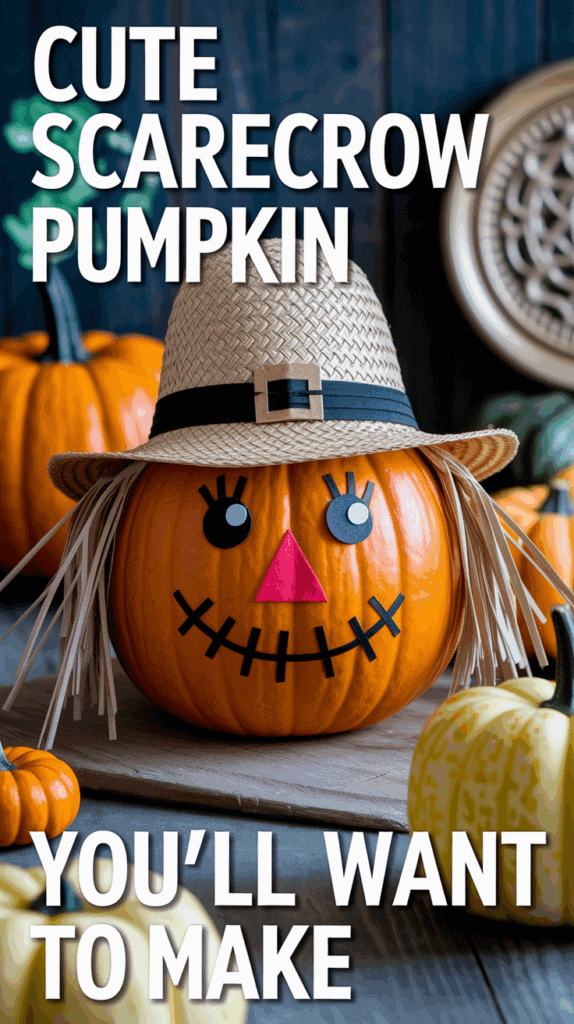
I’m not sure who gets more excited about our scarecrow porch project, me or my boys! With these no carve pumpkin ideas as our guide, making a scarecrow together becomes the highlight of our fall. This is where all the little choices—funny faces, wild hats, silly shirts—turn an ordinary pumpkin into a porch superstar. Now, the real fun starts: giving your scarecrow a look that shows off your family’s personality. Whether you want goofy, spooky, or downright adorable, the right decorations make it shine. Let’s get those little hands busy and fill your porch with smiles!
Giving Your Scarecrow Personality: Decorating Tips and Tricks
This is where you hand over the reins to the kids and watch magic happen! The best part about a no-carve pumpkin scarecrow is the freedom to let every child’s imagination go wild. You don’t need to be a Pinterest genius. Just have fun and let everyone’s ideas matter. Here’s how I keep it simple, playful, and packed with personality.
Face Time: Let Kids Lead the Way
A scarecrow’s face sets the whole mood. Happy, silly, even a little mischievous—it all works! Here’s how we like to let the creativity flow:
- Paints and Markers: Washable paints work best for bold colors. Markers add fun details like freckles, mustaches, or big eyelashes.
- Googly Eyes: Hot glue (which I handle!) keeps them in place. My boys love giant googly eyes for extra silliness.
- Sticker Magic: Peel-and-stick gems, mustaches, or fake glasses are fun and easy for little hands.
- Yarn for Hair or Eyebrows: Glue or tape works. Try yarn in yellow, orange, or brown for a classic scarecrow look.
To keep it kid-friendly, I encourage each boy to pick their own face style. There’s no right or wrong in our house—a goofy grin gets just as many laughs as a surprised “oh!” face!
Hat Parade: Top Off Your Creation
A scarecrow without a hat is like pancakes without syrup. Hats finish the whole look. Plus, they can cover any oopsies up top!
Some favorites from our hat bin:
- Straw hats for that classic farm vibe.
- Floppy sun hats (even ones from the dress-up box).
- Baseball caps for a fun twist.
- Beanies or even silly costume hats right from Halloween.
Sometimes, we stuff a little tissue or felt in the hat to help it sit just right. And if it’s windy outside, I pop a safety pin through the hat and into the pumpkin stem. Quick and easy!
Dressing Up: Clothes Add Character
Letting kids play dress-up with their scarecrow is always a big hit at our house. It’s simple, sweet, and full of giggles. I encourage the boys to hunt for old shirts, mini jackets, or even dress-up capes. No need to buy anything new!
Tried-and-true picks:
- Plaid flannel shirts (classic, cozy, and always cute).
- Jeans, overalls, or toddler pants—we knot or rubber band the ends so stuffing doesn’t fall out.
- Bandanas, scarves, or neckties for a pop of color.
- Vests or old cardigans—layering makes it extra charming.
To fit the scarecrow, I sometimes tuck sleeves or safety-pin shirts for a better shape. It’s all part of the messy, happy fun!
Accessorize for Extra Flair
Kids love adding “just one more thing” to their scarecrow, and honestly, sometimes it’s the silly extras that become their favorite part.
Fun details you can add:
- Mini mittens or gloves for funny hands.
- Buttons down the shirt—big, colorful, or mismatched gets the most giggles.
- Raffia, straw, or shredded paper popping out of the sleeves, neck, and hat for that playful, hay-stuffed look.
- Faux crows, birds, or tiny props—one year, we even attached a plastic spider on ours!
- Seasonal touches: Add a few silk leaves, tie on a mini pumpkin, or tuck in a sunflower.
Let your kids lead here. Our scarecrow sometimes sports sunglasses, rain boots, or even a superhero cape. The more personality, the better.
Tips to Keep It Kid-Friendly and Fun
Making this project a true family memory means letting go of perfection. The joy is in the process, not just the finished porch masterpiece! Here’s how I keep things moving and happy for busy families:
- Stick with washable supplies as much as possible, so mistakes are easy to fix and faces can be redone next year.
- Avoid anything sharp—glue sticks, soft yarn, and safety scissors only.
- Celebrate every idea. If your child wants dinosaurs on the scarecrow, go for it!
- Take plenty of pictures as you go; the goofy in-progress shots are just as sweet as the finished display.
- Rotate who gets to pick each piece. Everyone gets a turn, which cuts down on squabbles and keeps the decorating fair.
The best thing about these no carve pumpkin ideas is that there are no rules except to have fun. As long as your scarecrow makes your kids smile and brings a touch of happy chaos to the porch, you’ve done it right!
Porch Display Inspiration: Making Your No-Carve Pumpkin Scarecrow Shine
Nothing makes me happier than stepping onto our porch and seeing our no carve pumpkin ideas front and center. That silly, smiling scarecrow works as the official greeter of our house all season. Every time I see the boys’ creative touches—wonky hats, wild scarf choices, and dramatic eyebrows—I catch myself grinning. The porch is the first thing visitors notice, so why not turn it into a fall showstopper? I like to treat our scarecrow not as just one part of the porch, but as the star of our autumn display. The right setting makes all the difference!
Picking the Perfect Porch Spot
Where you set up your scarecrow really sets the mood. I look for a spot that gets both good light (so those pumpkin faces shine) and enough shelter from rain or strong wind. I also think about what people see first from the driveway or sidewalk. I want our porch to feel like a hug before folks even knock!
Here’s what I look for when choosing a spot:
- Near the front steps: This makes the scarecrow the main feature as guests walk in.
- Next to a railing or porch post: This helps keep everything steady, especially on windy days.
- Close to your door but not blocking it: That way, you won’t trip over boots, backpacks, or your new pumpkin friend.
If your porch is small, use corners or even the top step to make the display look full without blocking foot traffic. Sometimes I put our scarecrow on a sturdy chair to give him a boost—like he’s keeping watch over the street!
Grouping with Fall Decor Favorites

A great scarecrow display shines even brighter with a little backup. I like to group our scarecrow with other cozy fall touches. Mixing textures, shapes, and colors helps the scene look thoughtful and ready for any family photo op.
Some of my porch favorites:
- Hay bales: Great for raising up pumpkins or making a seat for your scarecrow.
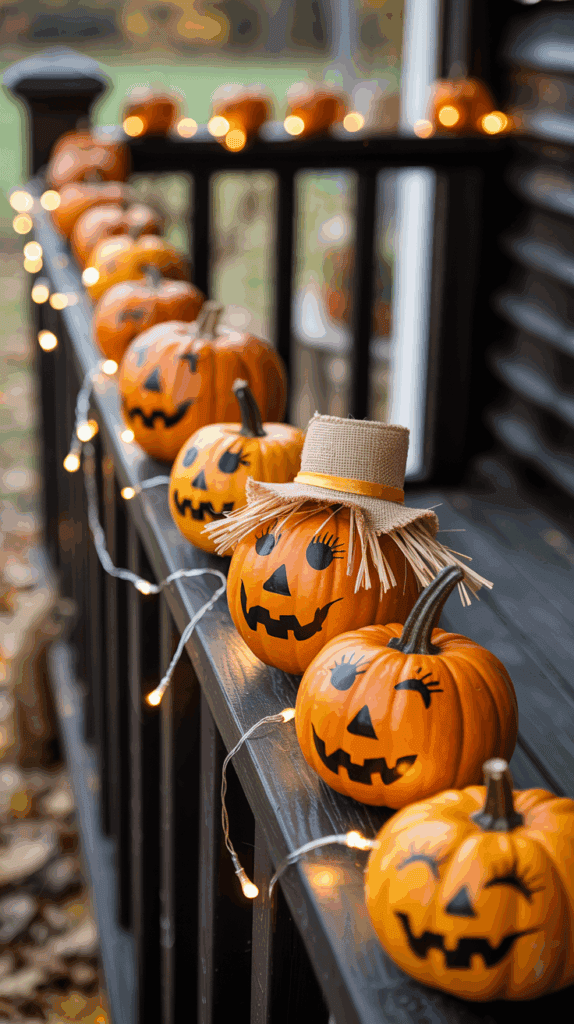
- Extra pumpkins and gourds: Use different shapes and colors for more interest (and to show off those super unique no carve pumpkin ideas).
- Big, bright mums: I love tucking in a few pots for a pop of fall color.
- Lanterns or string lights: For evening glow and a warm welcome.
- Old wagon wheels, crates, or baskets: Use what you have to make the porch feel inviting without buying anything new.
Get creative with the arrangement! Sometimes I make our scarecrow look like he’s holding a basket of tiny pumpkins, or set up a toy tractor right by his feet.
Coordinating Colors for a Cohesive Look
I don’t have time (or the desire) to chase a porch theme that takes all day. I stick to easy color tricks for a pulled-together look. I like matching the scarecrow’s clothes and pumpkin decorations to the rest of our porch pieces.
Here’s how I make it all feel like one cheerful group:
- Tie bandanas or ribbons on nearby baskets to match the scarecrow’s scarf.
- Use similar colored mums and pumpkin accessories (like adding sunflowers or leaves from the same color family).
- Choose a couple of standout colors and sprinkle them through your accessories. Orange and yellow always work, but navy or even light green can be fun too!
Kids love picking out new color combos every year, which keeps things fresh. Sometimes we go “classic farmyard” with plaid and denim, and other years it’s “rainbow explosion” with wild hats and bright scarves. There’s no wrong way.
Adding Height and Layers for Wow Factor
A flat porch display can disappear fast, especially if your house sits back from the street. I add height and layers so the scarecrow stands out and the whole setting feels extra cozy.
Ways I use height and layers:
- Prop larger pumpkins or baskets on top of hay bales.
- Place smaller pumpkins or candy buckets tucked by the scarecrow’s feet.
- Hang a fall wreath or banner above the scarecrow’s head, tying the whole space together.
- Put lanterns at different heights, like on a crate or old wooden step stool.
Layers help everything look more finished while helping your scarecrow truly shine, no matter how busy or simple the porch gets.
Little Details That Stand Out
The best displays are full of small touches that make people stop and look closer! Kids always notice the extras, and it’s these playful pieces that make family memories.
Here are the details that get the most attention on our porch:
- Mini signs: A hand-painted “Happy Fall!” or “Welcome Friends!” tucked in a pail.
- Seasonal props: Maybe the scarecrow is holding a broom, clutching a bouquet of silk leaves, or waving a tiny flag.
- Personal touches: Sometimes I add a few of the boys’ plastic farm animals or favorite toys around the display, just for fun.
- Chalkboard messages: Leave a little chalkboard near your scarecrow and let the kids draw new pictures every week—easy, cheap, and always cute.
- Weather-ready details: If it’s wet outside, I give the scarecrow little rain boots or tuck an umbrella nearby. Instant charm!
You can swap extras as the season rolls on. Mums and pumpkins hold strong through October and November, while a new scarf or hat gives your scarecrow a fresh look after Halloween.
Lighting for Magical Evenings
Nothing beats coming home in the evening to a warm, glowing porch. I always try to work in some lights so our scarecrow doesn’t disappear at sundown.
Simple lighting tricks:
- String battery-operated fairy lights around the scarecrow’s shoulders, hat, or even up the railing.
- Use solar lanterns or LED candles for soft glows that are safe around curious hands and little boots.
- Place a spotlight behind or below the scarecrow for dramatic shadows and bright faces.
If you have an outlet outside, plug in a small set of twinkle lights for even more magic. Just make sure cords are tucked away from foot traffic!
Making Your Display Last
To keep your porch dreamy all season, I take a few easy steps that help both pumpkins and props look their best.
What works for us:
- Put a mat or tarp under hay, pumpkins, and the scarecrow’s “feet” to avoid stains or soggy mess.
- Bring in props (like special hats) when storms roll in.
- If the scarecrow sits on fabric furniture, check each week for any dampness from rain or morning dew.
With a little care, your porch display won’t just last for trick-or-treat night but will keep the fall spirit rolling until the first snowflakes fall.
With a few personal touches, the right setting, and a little help from your kids, your no-carve pumpkin scarecrow can become the highlight of your porch. There’s nothing better than a happy scarecrow smiling back every time you come home!
Easy Cleanup and Storage: Keeping Memories Without the Mess

Keeping fall memories strong without ending up ankle-deep in glitter, feathers, or clumps of dried glue is a miracle for any mom. One of my favorite things about no carve pumpkin ideas is how the fun sticks around while the mess does not. When your porch is covered in colorful scarecrow smiles, the last thing you want is to spend hours cleaning up after the family fun. I always want our traditions to live on without extra stress, so let’s talk simple tips to clean up and store your pumpkin creations without turning your home into a chaos zone.
Quick Cleanup Tips After Decor Time
Once the last giggle fades and everyone’s racing inside for hot cocoa, I want to be done with pumpkin cleanup fast. Here’s how I keep it easy and almost painless every single year.
- Have a trash bag ready: As decorations come off the table, they go straight into the bag, not the floor.
- Stock up on wipes and paper towels: Paint smears and glue puddles wipe up much easier while still wet.
- Buckets for water: I always keep a small tub for rinsing sticky hands. It saves extra trips to the bathroom.
- Table covers save your surfaces: An old shower curtain works even better than newspaper and is washable.
- Encourage the kids to help: Mine love a “race to tidy up,” tossing scraps in the bin for a small prize or sticker.
Messy doesn’t have to mean chaos. With these little tricks, you can swap from DIY day to cozy evening in no time!
Storing Keepsake Decorations
I love keeping the best scarecrow pieces for next fall. Some hats, scarves, or painted faces just make me smile all over again! Pumpkin bodies eventually go, but those special touches can be saved for as long as you want.
- Let paint dry completely: Before storing, give anything painted at least 24 hours to cure.
- Use zippered bags or storage bins: Group similar items (hats, buttons, cut fabric patches) together in small bags or clear bins. Label them by year or kid, if you’re sentimental like me.
- Store soft items flat: Lay scarves, shirts, and felt out flat in a bin to keep wrinkles away.
- Re-use plastic grocery sacks: Stuff them into hats or boots to help keep their shape until next year.
- Hang a photo on the bin: I drop a snapshot of our completed scarecrow in the box so next year’s setup brings back those sweet memories in a flash.
These bins keep our porch decorations organized and ready to go—no hunting through piles of random holiday stuff.
Saving Special Pumpkin Faces
Sometimes, the kids knock it out of the park with a pumpkin face too cute to toss. Since a real pumpkin won’t last until next year, I save the memory in a way that lasts much longer.
- Snap lots of photos: Take close-ups of the best faces. Print or save them in a fall album.
- Peel off stickers or googly eyes: If your little ones used stickers, pop them off and stick them onto wax paper for a keepsake page.
- Cut out fabric patches or painted foam pieces: If something is glued on, gently remove it and save in a little envelope marked with each child’s name.
Sometimes, we even glue our favorite scarecrow faces to a brown paper bag for a “puppet show” later. The pumpkin may not last, but the giggles sure do!
Smart Tips for Storing Pumpkin Supplies
No carve pumpkin ideas mean a basket full of art and craft supplies waiting for the next burst of fall inspiration. I keep our supplies rounded up and ready to roll for next season—no last-minute shopping or panicked searches.
- Clear shoe boxes for small items: Markers, paint bottles, googly eyes, and buttons slip neatly into these.
- Fabric drawers or old lunchboxes: Scarves and felt bits stay organized and won’t fray.
- Stackable bins: Place larger clothing, hats, and accessories by theme or kid. Easy to grab when you’re ready.
- Put bins up high, out of season: I keep ours on a top closet shelf, away from curious hands and spring fever.
An organized system keeps surprises on the porch, not in your living room closet.
How to Say Goodbye (Tidy) to Pumpkins
When the season wraps up and it’s time to clear the porch, there’s a simple process I use. No one wants moldy pumpkins around, and I want any bits we plan to save to be spotless.
- Remove accessories first: Scarves, hats, fake eyeballs, and arms come off and go in the storage bin or trash bag.
- Check for stains: Anything with stuck-on paint or sticky glue might need a quick wipe before storing.
- Compost real pumpkins: We toss ours in the garden or add to the compost pile (the boys love watching them break down for next year’s flowers).
- Recycle or donate what you can: Old shirts and pants can get a second life or go back in the donation pile.
Teaching the kids to help means I’m not stuck doing the whole teardown alone—and we all get to enjoy a tidy porch faster.
Keeping the Memories Alive Year After Year
Nothing beats pulling out last year’s box of hats and finding a goofy button or tangle of yarn the kids forgot. I toss in a photo or a little note, and when next fall rolls around, we’re greeted by our family’s happy history. Every pumpkin is a fresh start, but the best parts come back with us for another season.
No carve pumpkin ideas not only save my sanity on clean-up day—they give our family memories a safe place to live until next fall. That’s worth celebrating, mess or no mess!
Conclusion
Bringing no carve pumpkin ideas to life on our porch has given my family so many happy memories, all with less stress and zero sharp tools. I love how this tradition lets my boys jump in, get messy in the best way, and add their own silly flair every year. We skip the fuss of carving and still fill our porch with color, character, and big smiles.
There is something special about watching a scarecrow take shape from a pile of our old shirts and some paint. Your own porch will light up, and you might just start a tradition your kids can look forward to each fall. I hope you feel inspired to try your own version, snap a picture, and share it with friends or neighbors who could use a little extra cheer.
Thanks for joining me on this pumpkin adventure! I’d love to see your scarecrow creations or hear about your favorite no carve pumpkin ideas. Drop a comment, swap photos, or tell your best fall story, because sharing these moments is half the fun. Happy fall from our busy, pumpkin-filled home to yours!
This post may contain affiliate links. Read the full disclosure here.