Spooky Tablescape Ideas for a Stylishly Haunted Dinner
Hello there, fellow moms! As a busy mom of three wild and silly boys, Halloween dinner may just be my favorite excuse to turn our dining room into a spooky tablescape everyone can love. The boys can barely wait to see what I come up with (let’s be honest, neither can I), and I always want it to feel fun without losing that splash of style I love so much.
This black lace table runner sets the perfect spooky yet chic vibe for dinner parties.
I promise, you really can pull off a spooky tablescape that’s both kid-friendly and chic! Get ready for tips and ideas that make decorating fast, affordable, and easy enough that the kids can help—without breaking too many dishes. Let’s make this Halloween dinner feel just a little more magical for the whole family!

Theme and Color Palette


A great spooky tablescape needs just the right mix of color and fun to really set the mood. I love picking a palette that hints at “haunted” but still keeps things stylish. Honestly, the theme and color choices can make or break the spooky tablescape, so I spend a few extra minutes thinking through every detail before the boys rush in to set it all out!
Choosing a Dark Base


The first step in my spooky tablescape is starting with a dramatic backdrop. Dark colors always feel a little more mysterious and chic, and they help even Dollar Store decorations feel like designer finds. My top choices for the base layer:
- Black velvet or cotton tablecloths
- Deep navy, which adds a twist but still feels moody
- Charcoal gray for a softer (but still shadowy!) vibe
I usually use a plain black cloth since it hides any jelly smudges from the boys and makes cleanup less stressful. For parties with lots of little hands, I recommend adding a clear disposable liner under your tablecloth. It keeps your nice linens safe and, honestly, it’s a lifesaver when grape juice “jumps” onto the table! A quick tip: If you’re worried about time, disposable tablecloths in black or gray give the same effect and take seconds to toss away.
Accent Colors That Pop

With the base all set, I always like to brighten things up with accent colors that really pop. When your table is mostly dark, just a few bold colors take center stage and bring it to life. Some of my favorite accent shades:
- Metallic gold (for chargers, napkin rings, or candlesticks): This adds a flash of luxury and looks amazing by candlelight.
- Blood red (on napkins, ribbon, or glassware): It’s spooky but still family-friendly. A few deep red roses in a vase or “bloody” drink stirrers are a big hit with the kids!
- Eerie green (candles or paper bats): This gives you that Halloween pop without flooding the table with orange.
Try switching up where you use color. For example, if you’re using gold on your plates, add red or green in the candles, or layer napkins so each seat gets a slightly different accent. The main goal is to add just enough sparkle and spook to make your guests smile when they sit down.
Seasonal Touches

Bringing in some real autumn charm always finishes the look. Whether you’re going classy or fun, little seasonal details keep everything on theme and make your spooky tablescape look inviting instead of stiff. These are some of my go-tos:
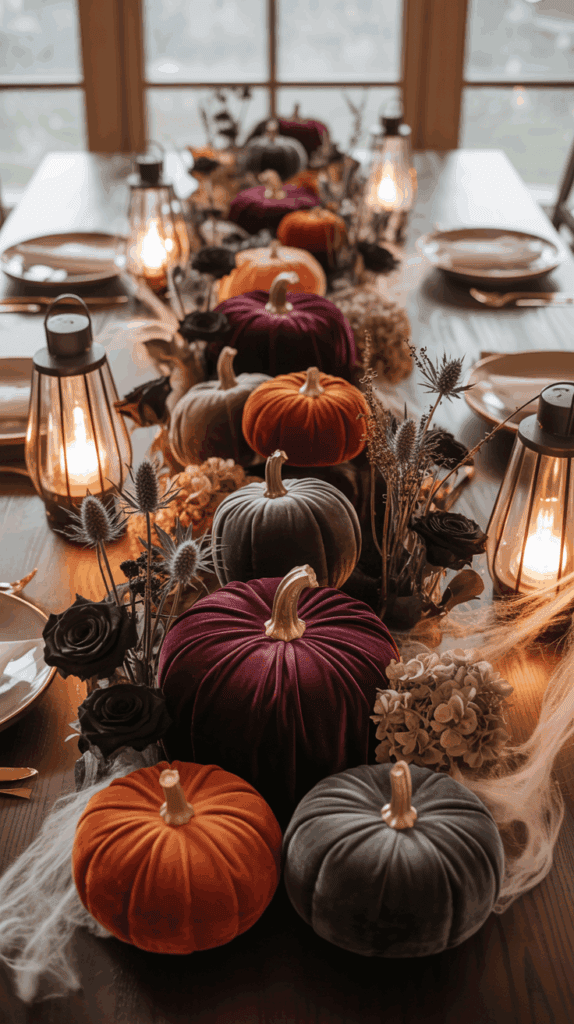
- Mini pumpkins or gourds (white, orange, or spray-painted black): Clustered down the center or at each place setting, they’re quick and adorable.
- Dried leaves and branches: Scatter a handful along the table runner, or tuck a leaf under each plate for a “found in the garden” touch.
- Faux cobwebs and plastic spiders: The boys love stretching spider webs across candlesticks and picture frames. You can let the kids get creative here—mine always try to outdo each other on “creepiest” design!
- Table scatter: Grab some glittery bats, skeleton confetti, or sparkly acorns to fill in empty spots without making it feel crowded.
Here’s a quick table of my favorite seasonal accents with suggested uses:
| Accent | Where to Use | Kid-Friendly? |
|---|---|---|
| Mini pumpkins | Centerpiece, place settings | Yes |
| Dried leaves | Table runner, under plates | Yes (watch for allergies) |
| Faux cobwebs | Candles, backs of chairs | Yes (with supervision) |
| Plastic spiders | Plates, napkin rings | Yes (not for babies) |
| Glittery bats | Scattered across the table | Yes |
Picking just two or three of these keeps the look balanced and not too “cluttered,” even if the boys get enthusiastic about their spooky add-ons. By sticking to a simple, moody palette and bright accent colors, you can pull the whole tablescape together without spending hours clipping coupons or running to a dozen stores. The end result feels festive, pulled-together, and oh-so-haunted—in the best way!
Tabletop Essentials
Alright, now that the colors and theme are locked in, it’s time to pull the whole Spooky Tablescape together with the little things that make a big difference: the actual tabletop essentials! When you get these details right, your table looks like something out of a Halloween storybook (but way less dusty and definitely more mom-approved). I love using pieces that feel special but still hold up to sticky little hands! Here’s how I set the stage, from the first layer to the last fork.
Tablecloths and Runners
For my haunted setup, I always start with a deep black tablecloth. It’s classic, bold, and somehow manages to hide glitter, crumbs, and the occasional spilled juice. I picked up a washable cotton one years ago, and it’s still my go-to every October. If you want a hint of fancy gothic flair, try layering a lace runner over the top. The combo of heavy black with delicate lace gives a really cool, aged feel—like you just stepped into an old, haunted manor (minus the cobwebs).
Printed runners work, too! There are so many cute ones with bats, spiders, or creepy trees. My tip is to choose machine-washable fabric so you don’t worry about stains and can pack it away for next year. So worth it!
- Solid black cloth hides messes and makes decorations pop.
- Lace runners add vintage “haunted house” vibes on top.
- Printed runners (spiderwebs, bats, or ghosts) give instant festivity.
- Look for machine-washable and reusable fabrics.
Plates and Bowls

Plates and bowls are where the magic happens! I switch things up every year, but my favorites are matte black plates. They’re spooky, chic, and turn even frozen pizza slices into a stylish dinner. If you want to lighten the mood, white plates with fun Halloween decals (think eyeballs, little ghosts, or skeleton hands) look so cute mixed in.
Here’s my trick: For side dishes or snacks, I bring out bowls shaped like little skulls or pumpkins. The boys LOVE this part. A skull bowl full of grapes or popcorn is always the first thing to disappear! Mixing shapes adds that playful element without making your table look too busy.
- Matte black plates look chic and highlight colorful food.
- White plates with Halloween pictures add a fun pop.
- Skull and pumpkin bowls are perfect for candy, snacks, or dips.
- Melamine plates are great for kids, no shattering if a plate “flies” off the table.
Cutlery with a Twist
Why stop at plain forks and spoons? For my Spooky Tablescape, I love giving the cutlery a little personality! Sometimes I use matte black spray paint to cover old silverware (make sure it’s food-safe spray and let it dry overnight). It’s the quickest way to give your table a “witchy” look without spending for new utensils.
I’ve also tried adding bone-shaped handles or little skeleton-hand charms to each fork and knife. The best part? The boys giggle every time they notice a “bone” on their fork. It’s just enough spook without turning dinnertime into a costume party.
- Matte black spray gives old forks a haunted glow.
- Attach small bone-shaped handles or skeleton charms for subtle fun.
- Mix and match with your regular set for a not-too-scary vibe.
A simple switch like black or bone-themed cutlery really finishes the look and makes your guests do a double-take. Plus, if the boys help, they feel like part of the spooky magic!
Creative Centerpieces

Let’s talk about the fun part—centerpieces! A Spooky Tablescape needs something eye-catching at its heart, something that makes everyone (even the pickiest goblin or ghost at the table) go “wow!” I love to pile on pieces that are festive, budget-friendly, and totally moveable, because what is more fun than watching your kids rearrange the table as soon as you finish? Here’s how I make centerpieces the star of Halloween dinner, with easy tips you can actually pull off in a single afternoon.
Candle Arrangements
The glow of flickering candles might be the most magical touch you can bring to any Spooky Tablescape, but real flames and wiggly kids are a recipe for disaster. This is where battery-operated candles absolutely save the day. They give all the atmosphere with none of the worry.
Here’s my step-by-step secret for a gothic, glowy centerpiece that still feels safe for little hands:
- Gather jars. I use whatever I have—mason jars, old jam jars, even those cute yogurt pots.
- Drop in candles. Place a battery candle inside each jar. I like to mix different heights to make it feel mysterious.
- Add faux blood drips. Squeeze red gel icing or melted red wax carefully around the jar rims. It drips down just right and looks spooky without making a mess. The boys love helping with this trick.
- Tuck in branches. Collect bare twigs from outside, clean them off, and nestle them around your jars. If you want, spray the branches black for an extra-creepy feel. I scatter a few small bats and plastic spiders between the twigs for extra holiday flair.
Why does this work? Clustering jars and candles in groups of three or five makes everything look intentional. Rather than a lonesome candle, you’ve got a soft, gothic glow that transforms your table into a storybook haunted forest. And since they’re battery-operated, you don’t have to worry about flames or smoke!
Miniature Haunted Props

Nothing keeps kids’ hands busier (and happier!) than centerpieces they can actually touch and play with. I always fill my Spooky Tablescape with little haunted props. These pieces are quick to move around, so everyone can join the fun and even make up their own haunted story as they sit down to eat.
For a centerpiece that’s interactive and cute, I like to mix and match:
- Tiny tombstones: Look for plastic tombstones in the party aisle, or make your own from thick gray card. Write silly names in chalk for an extra laugh.
- Plastic spiders: Scatter these between plates or nestle them onto napkins. I sometimes hide one under a bread basket and watch for the first shriek of discovery—never gets old!
- Mini skulls: Lightweight, palm-sized skulls add instant spook. The boys love putting snack bowls on top of them, or pretending they’re little haunted “guards” for dessert.
Pro tip: Put a small basket in the middle of the table to corral all the mini props when the main dish arrives. It keeps the table neat and lets the kids pick them up again after dinner.
Here’s a quick table so you can pick your haunt-worthy favorites:
| Prop | Where to Place | Kid Involvement |
|---|---|---|
| Tiny tombstones | Nestled in moss, end of runner | Name them, move them |
| Plastic spiders | Napkins, plates, candle jars | Hide & seek game |
| Mini skull figurines | Next to bowls, on placemats | Stack, pretend stories |
The best part? At the end of the night, the kids have their own little haunted collection for the next round of fun.
Edible Decorations
When the centerpiece is also a snack? That’s a win for everyone at the table. Halloween is the one time of year when nobody expects the “bones” in the centerpiece to be real—which is good, because I much prefer mine made of chocolate and pretzels!
Here are my favorite edible decorations that double as decor and dessert:
- Chocolate-covered pretzel sticks as ‘bones’: Dip pretzel rods in white chocolate, then let them cool. Pile them high in a ceramic pumpkin or glass jar right in the center. Sometimes I tie a little black ribbon around each one for extra flair.
- Candy corn as graveyard stones: Sprinkle candy corn in little clusters around the candle jars or run them in a wavy path down a black napkin “graveyard.” It’s bright, on-theme, and so easy for little hands to snag.
- Dark chocolate drizzle on desserts: Before serving, I give brownies, cookies, or even fresh fruit a spooky drizzle of melted dark chocolate. Swirl it in zigzags or big circles (nothing fancy). The look is a little gothic and a lot delicious.
Need ideas at a glance? Here’s what I use for edible table fun:
| Edible Decoration | How to Display | Kid Appeal |
|---|---|---|
| Chocolate pretzel bones | In jars, on snack boards | Crunchy, interactive |
| Candy corn stones | Scattered like confetti | Colorful, easy grabbing |
| Dark chocolate drizzle | On cakes, fruit, brownies | Messy, sweet fun |
I love how these edible touches make even the simplest centerpiece feel complete. Guests (especially kids) nibble as you chat, so the table always feels lively, festive, and a tiny bit haunted—in all the right ways!
Atmospheric Details
Every Spooky Tablescape needs more than just what you see on the surface. When I really want to impress my boys and our guests, I bring in simple elements that fill the room with mood and magic. Lighting, sound, smells, and tiny details add that layer of “haunted house” without real ghosts hiding in the pantry. These tricks help pull everyone into the moment and make dinner feel like a spooky adventure!
Lighting and Shadows
Lighting is the secret weapon for making any Spooky Tablescape feel unforgettable. No matter how many decorations you add, if the lighting is flat or too bright, the scene just feels off. I love watching my boys’ faces change as the dining room takes on a new life in dim, mysterious light. It’s the quickest way to make an ordinary dinner feel like a party!
Here’s how I create those perfect spooky shadows:
- String lights: I hang a strand of dim orange or purple string lights along the windows or the hutch. They cast just enough glow to feel cozy, but still spooky.
- Orange bulbs: Swapping out our normal dining room bulbs for orange or red ones makes the whole space look otherworldly. It’s a small swap, but the effect is huge.
- Flashlights under the table: This is my secret trick for extra drama! Place a few small flashlights under the table, aimed at odd angles or bouncing off the legs. Suddenly, there are ghostly shadows popping up where you least expect them. The boys go wild for this, and it makes the whole table feel alive.
If you have battery-powered lanterns or even a couple of tap lights, tuck them behind your centerpiece or in corners for a little extra flicker. The more cozy shadows, the spookier the mood. And since there’s no real flame, everything feels safe and stress-free — which might be the best part for moms!
Sound and Smell
Setting the mood isn’t just about what you see. The right sounds and smells make a Spooky Tablescape feel richer and more thrilling for the whole family. When your kids walk in to haunting music and that warm, spicy scent, they’ll know dinner isn’t just another meal—it’s something special!
Here’s my simple routine for capturing every sense:
- Creepy music: I stream a playlist of soft, spooky sounds at low volume. If you search for “haunted house ambiance” or “Halloween dinner background music,” you’ll find so many great options. I stay away from anything too loud or jumpy — this is dinner, not a haunted hayride!
- Pumpkin spice or cinnamon: I let a candle or essential oil diffuser do the work here. One small pumpkin spice or cinnamon candle on the buffet sends that classic autumn scent through the room. For kids (and sensitive noses), go easy — one candle is plenty. You want it to feel festive, not like a bakery explosion!
If you don’t want a real candle near little hands, I sometimes simmer a small pot of water with a handful of cinnamon sticks and orange slices on the stove before guests arrive. It fills the whole house and makes everyone smile before they even sit down. Dinner with all the senses tickled is always a hit!
Table Numbers and Place Cards
Little touches at each seat pull your Spooky Tablescape together and send the message that every guest matters. Place cards and table numbers make it feel like a real event. My favorite part? The boys can help, which keeps their fingers busy and lets them join in on the magic!
How I keep it fun and easy:
- Tombstone place cards: We cut thick gray or black construction paper into simple tombstone shapes. Use white colored pencil or chalk for names (adding a little “RIP” or silly title gets a huge laugh). Stick them in a dab of play-dough or a mini pumpkin so they stand upright at each plate.
- Old parchment number plates: For numbering, take plain white or beige paper and lightly burn the edges (grownup job!) or use a brown marker to give an aged look. Write numbers with a curvy, spooky script and set one at each spot, or tie it around cups with twine for more texture.
Kids get a kick out of designing their own names and numbers. If they want to add tiny drawings (like bats, bones, or spider webs), let them go wild! These little extras are more than just labels—they become treasured souvenirs after dinner.
Here’s a simple ideas list to get you started:
- Use card stock in gray, black, or tan for an authentic “graveyard” or “old letter” look
- Stick place cards upright in mini pumpkins, a ball of clay, or even tucked into napkin rings
- Let each child invent a silly “haunted” nickname for their card
With a little imagination and some help from eager hands, these details bring your whole Spooky Tablescape to life and make everyone feel like a VIP in your haunted dining room!
Kid‑Friendly Scares
Making a “Spooky Tablescape” little kids can enjoy (without any parental panic) is always my goal. I know how fast excited little hands reach for decorations, so everything on my table has to look spooky but stay safe and fun. This section is full of ideas for adding just the right level of shivers—think more “giggle” than “goosebumps.” These tricks make Halloween dinner feel like an adventure even for the youngest guests because no one wants tears over a toppled prop or a broken plate!
Safe Props for Little Hands
You don’t have to worry about safety when the props are soft, light, and built for play. I swap out anything breakable for decorations made with foam, felt, or plush. Not only do they survive my boys’ wild imaginations, but they also double as toys after dinner.
Here are a few favorites that can handle even the rowdiest crowd:
- Plush ghosts and pumpkins: Soft, huggable, and totally squishable! My boys carry them around all night, or stack them in little pumpkin piles.
- Foam tombstones: These can be decorated with silly faces using washable markers. Nobody gets hurt if a “tombstone” tumbles onto a tiny foot.
- Felt bats and spiders: Lightweight and easy to move. Let the kids stick them on napkin rings, chairs, or the edge of their plates.
- Fabric witch hats: Tiny hats make adorable place markers—or wear them on favorite stuffed animals for instant laughs.
Everything in this list looks spooky but feels plush and playful. You can drop a bowl, or knock over a ghost, and nothing cracks or shatters. That’s a win for me (and probably for my floors).
Interactive Elements
Nothing keeps kids happier at the table than a surprise. When I really want grins, I add simple games or treats right into the tablescape. It keeps the boys at the table longer, and suddenly everyone’s excited to see what Halloween fun is hidden under their plate!
Some simple ideas for interactive magic:
- Find the Hidden Candy: Tuck a wrapped chocolate or small treat underneath every plate. When everyone sits down, invite the kids to peek under their spot before dinner starts—instant giggles!
- Mystery Box at Each Seat: I reuse empty tissue boxes, wrap them in black paper, and cut a small hole on top. Inside, I hide mini flashlights, stickers, or Halloween pencils. No peeking until mom gives the signal!
- Mini scavenger hunt: Place four or five tiny spider rings or glow-in-the-dark bugs around the table for each child to find. Whoever finds them all first gets to choose dessert.
Games like these are easy to set up and bring the whole table together. The kids feel like they’re part of the spooky magic, not just spectators.
Fun Food Presentation
If you want a tablescape that doubles as entertainment, serve food with a twist! I can’t tell you how many times a themed dinner saved the evening in my house. The boys eat better when their favorite Halloween creatures are looking back at them.
Here are some ideas that always earn a “Wow!”:
- Mac and Cheese Cauldrons: Spoon cheesy goodness into black bowls or little plastic cauldrons. Add a breadstick “stirring wand” and a green gummy worm for a silly potion vibe.
- Mummy Hot Dogs: Wrap hot dogs in strips of crescent dough, leaving just enough space for two mustard “eyes.” Bake until golden and serve upright in a tray. These always disappear scary fast!
- Spider Web Fruit Tray: Arrange sliced kiwi or orange segments in a circle on a white plate, then use thinly sliced apple peels or licorice strings to create a web. Pop a few blueberry “spiders” on top for the finishing touch.
The best part? These dishes look spooky but taste familiar, so even picky eaters can join the fun. When food doubles as decoration, you get fewer complaints and lots of smiles—which is all any Halloween-loving mom could wish for!

Conclusion
Creating a Spooky Tablescape doesn’t have to be complicated or expensive. With a few simple touches, a splash of imagination, and some family teamwork, you can bring extra magic to your Halloween dinner. I know my boys will remember these nights filled with laughter, glowing candles, silly props, and foods that make us all smile.
If you try any of these tips, I hope you and your family have as much fun as we do! Snap a photo of your own Spooky Tablescape and share it with me—I’d love to see what you come up with. Thanks for making this tradition a little more special, and for inviting me into your home for a spooky, joy-filled night. Happy Halloween, moms!
This post may contain affiliate links. Read the full disclosure here.